WILLISTOWN CONSERVATION TRUST

  • Facebook
  • Instagram
  • LinkedIn
  • YouTube
DONATE
  • About
    • HOW WE WORK
    • WHERE WE WORK
    • OUR STAFF AND TRUSTEES
    • JOBS & INTERNSHIPS
    • VOLUNTEER
    • RUSHTON CONSERVATION CENTER
    • STRATEGIC PLAN
    • DIVERSITY, EQUITY & INCLUSION STATEMENT
    • FAQs
  • LATEST
    • BLOG
    • IN THE NEWS
    • PUBLICATIONS
    • PHOTOS
  • PROGRAMS
    • BIRD CONSERVATION
    • COMMUNITY FARM
    • EDUCATION
    • LAND PROTECTION
    • STEWARDSHIP
    • WATERSHED PROTECTION
  • NATURE PRESERVES
    • ASHBRIDGE PRESERVE
    • HARTMAN MEADOW
    • KESTREL HILL PRESERVE
    • KIRKWOOD PRESERVE
    • RUSHTON WOODS PRESERVE
  • EVENTS
    • EVENT CALENDAR
    • BARNS & BBQ
    • RUN-A-MUCK
    • WILDFLOWER WEEK
    • ECOCENTRIC EXPERIENCE
    • RUSHTON NATURE KEEPERS (RNK)
    • ACCESS Program
  • Support
    • WAYS TO GIVE
    • SPONSOR THE TRUST
    • CORPORATE PARTNERSHIP PROGRAM
    • JOIN THE SYCAMORE SOCIETY
    • LEGACY SOCIETY & PLANNED GIVING
    • DELCO Gives 2025
  • CAMPAIGN FOR KESTREL HILL PRESERVE

How to Make Your Own Native Terrarium

July 18, 2023 By Watershed Protection Team

By Sarah Barker

Terrariums are a fun and easy way to engage with the environment. It only takes one afternoon to gather your materials and scavenge for tiny creatures to include in your mini ecosystem! Terrariums are small indoor gardens that can be made from any kind of clear glass container with or without a lid. Most people use mason jars or bell jars for their terrariums, and if you would like to add some small bugs, we recommend choosing a jar with a lid so your little friends don’t run away! However, you can make one with just plants if you are a beginner or only have an open glass container handy.

Terrariums can be put together with only a few materials, most of which can be sourced from your backyard! Besides your glass jar, you’ll need some rocks to anchor the plant roots and provide a system to retain water, moss and/or other small plants, locally sourced soil, and plastic wrap. First, you will need to grab some stones ranging in size from small pebbles and gravel to larger rocks, depending on the size of your chosen container. Rocks from streams or on the banks of a pond are preferred because they come pre-loaded with nutrients from microalgae and fungi that can help your ecosystem to thrive. However, any rocks you can find around outside will work.

Next, you will want to look for clumps of moss from which to take a few pieces. When harvesting moss, it is best to pick from the middle of the colony as opposed to the edges so that the moss can grow back more quickly. To gather your moss, you can use a small spatula to slide underneath the rhizomes of the moss — their equivalent of roots — to keep the clumps from falling apart and to allow them to establish faster once placed in your terrarium. Only take a few pieces from any one colony and harvest sparingly, as moss is slow to grow!

If you want to include other small plants, choose little ferns, groundcover like clover or ground ivy, or even little wildflowers. During July, many wildflowers are in full bloom, making it the ideal time to find some lovely plants for your terrarium. However, moss should be the main member of your indoor plant community and you should try to pick plants that are found growing in the shade or partial sun, as these plants are more likely to do well in your terrarium. This is where an enclosed container can be especially helpful; the lid helps to keep moisture trapped in the system, and as sunlight heats up the inside of the jar, water condenses at the top of the jar.  Once it cools, the water drips back down into the rocks and soil, keeping the moss and plants hydrated without any additional input.

If you want to include a couple of bugs, look for small crawling critters found around moss patches or under rocks like roly-polys (aka pill bugs) or arthropods like springtails. If you are a more advanced terrarium keeper, millipedes are also a great option, though they are much larger and require a bit more care than their smaller counterparts. The reason for choosing these kinds of bugs is that they are all wonderful housekeepers! They are decomposers that are great at preventing algae and mold from building up inside your ecosystem by eating it all up. If you have a smaller terrarium, you may only want to grab a couple of roly-polys to make sure there is enough food for everyone.

To transport any chosen creatures, place them in a small, clean plastic container. Poke some holes in the lid to allow some air for your bugs to breathe and place a bit of dirt inside with a couple of pebbles and sticks for them to hang out on.

Once you’ve collected all of your materials, the first thing you should do when you get home is rinse off all of your moss and other plants, taking time to make sure any other insects you haven’t chosen to include are removed and placed back outside. You should also inspect the pebbles, gravel, and larger rocks you’ve collected and rinse away any clumps of dirt. At this point, you should also clean your glass container and remove any stickers or adhesive on the glass so that sunlight can reach the plants.

After cleaning your inclusions, the first step of assembly is to place your wet stones into the bottom of your jar; this layer will provide drainage for the soil and retain water to be cycled back into the ecosystem when heated up under sunlight. Next, cut out a piece of plastic wrap roughly the size and shape of your glass jar with some small holes poked in it. This layer prevents the soil from falling in between your pebbles, which can cause mold growth and prevent proper drainage. You could also add in activated charcoal or sphagnum moss in between the rock and soil layers to prevent mold buildup, keep your terrarium clean, and help it to last longer, but this is completely optional! These materials can be purchased online, at a pet shop, or in a garden store.

After positioning the plastic wrap, place the soil on top, though not too densely packed. Next, you can put in the moss and plants, and taking care to gently press them into the soil, you can create small depressions with your fingers for any plants with roots that need to be covered. You can also place a couple larger rocks in this layer and add moss to the top of them. At this point, you could add in any decorative elements you may have around the house like seashells, pieces of wood, figurines, etc. Get creative! 

Journalist Brandi D. Addison shares how to build a spooky terrarium.

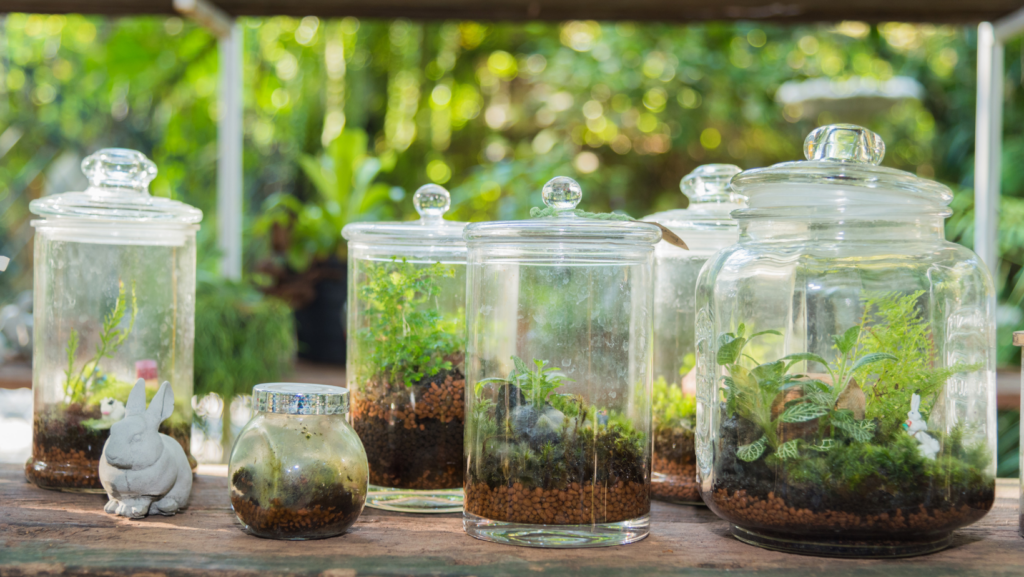
A small open terrarium (Credit: Brandi D. Addison, source here)

After adding in any decorative items, you can put in any bugs that you may have collected while you were outside. Make sure the rocks and soil are moist, and screw on your lid if you have one, and then, voila! Your terrarium is ready to go. Pop the jar on a partially shady table or desk that gets some natural light, but not direct sunlight, as moss tends to do better in shadier spots. 

Now sit back to watch your terrarium grow and change, modeling a miniature temperate ecosystem right in your own home. These ecosystems require only a little occasional upkeep. If you put a lid on your terrarium, you will not need to water it because the water will naturally cycle through the system. However, if your terrarium is open, you should make sure the soil is moist with occasional watering. You should also be sure the clean the inside and outside of the glass whenever it gets cloudy to allow sunlight to reach the plants. Every once and a while, smell the air in your terrarium. If it smells earthy that means it is healthy; however, if it smells bad that means that the soil is probably harboring some mold and should be replaced. 

Filed Under: Native Plants, Nature, Plastic Free July

Restoring Rushton’s Shrub-Scrub for the Benefit of the Birds

March 27, 2023 By CommIntern

By Mike Cranney, Preserve and Facilities Manager

For over 13 years, Willistown Conservation Trust’s (WCT) Bird Conservation program has been researching migratory and breeding bird populations at Rushton Woods Preserve. A trained team of staff and volunteers utilize mist nets placed strategically throughout the Preserve’s hedgerows to monitor species, collect data, and band individual birds so they can be tracked throughout North and South America. This research has helped contribute to the understanding of what birds need to survive, while highlighting the importance of places like Rushton Woods Preserve for migrating species to use as respite where they can rest and refuel during their long journeys every spring and fall.

Simply preserving open space, however, is not sufficient for their survival; birds require certain types of plants for adequate food and shelter. They are especially attracted to what is known as “scrub-shrub” habitat, which consists of robust thickets of shrubs and small trees that provide essential cover from both predators and the elements. This habitat is also an important source of food, but sadly our ecosystems have become overrun with non-native, invasive plants whose fruit do not have the nutritional value that birds need.

Prepping the area for new plantings.
Finished hedgerow. Now we watch it grow!

For example, one of the most common shrubs in the modern landscape is the Amur honeysuckle (Lonicera maackii), whose abundant berries are regularly eaten by fruit-loving bird species. However, these berries contain more sugar than fat, and therefore do not provide the fuel necessary to sustain migration. Birds depend on the insects and fruit found upon the native plants that have evolved in the landscape alongside them. In order to fully support bird populations, both the habitat structure and species composition need to be considered.

Unfortunately, the hedgerows at Rushton Woods Preserve have become heavily invaded by non-native species over the years. Both breeding and migrating birds still flock there, but they are not getting the nourishment that they need. A recent study conducted by a University of Pennsylvania graduate student found that birds stopping at the Preserve during migration were not gaining any fat, likely due to that fact that they were primarily eating fruit from Amur honeysuckle shrubs. The structure of the habitat is beneficial, but the plant species encompassing it are not.

Now, thanks to a generous grant from the Pennsylvania Society for Ornithology (PSO), WCT has begun the process of restoring the expansive hedgerow to native scrub-shrub habitat. In the fall of 2022, a roughly 5,000 square ft. area of invasive thicket was removed and replanted with over 150 native shrubs and trees representing 25 different species. Bird friendly varieties such as viburnums and chokeberries were emphasized and placed closely together to ensure that they grow into dense habitat. Moving forward, the goal is to repeat this process in a different section of the hedgerow each year until it is entirely restored with beneficial native plants. By working through piece by piece, the overall structure of the habitat can be maintained for the birds while the new plants mature.

Mike and volunteers planting native shrub hedgerow.
Sparrow in the shrub. Photo by Jennifer Mathes

The existing groups within the organization uniquely position WCT to make the best of this restoration project. The Land Stewardship team will handle the management of the planting site, while the Bird Conservation program’s ongoing research will be an excellent way to monitor the effect the improvements have on breeding and migratory birds. Additionally, the organization’s outreach and education departments will be able to capitalize on this endeavor as an opportunity for landowners to learn about the ecological value of habitat that is too often considered merely an eyesore. Above all, projects such as these are made possible through partnerships with groups like Pennsylvania Society for Ornithology that care about the environment and dedicate themselves to conservation.

To learn more about how you can plant native, stay tuned for this year’s Habitat at Home programming with our Stewardship Team!

Filed Under: Bird Conservation, Native Plants, Nature, Stewardship

Capturing a Snapshot of Darby Creek

December 7, 2022 By Anna Willig

By WCT Conservation Research and Data Specialist Anna Willig 

At the beginning of November, the Watershed Protection Program at Willistown Conservation Trust (WCT) partnered with the Darby Creek Valley Watershed Association (DCVA) and, together, enlisted four volunteers to conduct a sampling “blitz” in the Darby Creek Watershed. With the help of our determined volunteers, we collected samples from 19 previously unstudied sites in two hours (Map 1). Once the volunteers collected the samples, everyone met at the Upper Main Line YMCA’s Artisan Village to analyze water quality and discuss the results. 

Our Team (from left to right): Charlie Coulter (volunteer), Anna Willig (WCT, author), Lauren McGrath, Michelle Lampley (UMLY), Deirdre Gordon (volunteer), Lloyd Cole (volunteer), Dale Weaver (volunteer), and Aurora Dizel (DCVA).

Darby Creek originates in small tributaries along the Route 30 corridor from Easttown to Ardmore which flow together as the stream makes its way towards John Heinz National Wildlife Refuge where it meets the Delaware River. Throughout its length, Darby Creek flows through many highly developed areas, picking up road salts, fertilizers, and other pollutants from lawns, parking lots, and roadways. 

Despite these threats to the health of the stream, few community science studies have been completed to understand the health of Darby Creek and all of its tributaries. To shed some light on the water quality in the Darby Creek Watershed, the Darby Creek Community Science Monitoring Program was launched in 2021 in partnership with DCVA and under the scientific guidance of Stroud Water Research Center. To date, volunteers have been trained to collect high quality water chemistry data at 15 sites throughout the entire watershed every four weeks. 

The sampling blitz, which covered 19 sites in the headwaters of Darby Creek, allowed us to gain even more information on water quality while controlling for weather conditions. Rain, heat, and other weather conditions can impact water quality measurements. By sampling at a single point in time, we can capture differences in water quality between sample sites rather than changes caused by time. Many of the sampling sites were located on small tributaries, allowing us to study how fine-scale differences in land use upstream of the sample site can impact water quality. 

One of the goals of the sampling blitz was to understand salt pollution in the headwaters of Darby Creek. Road salts applied in the winter end up in streams as snow and ice melt and flow into the nearest waterway. Salts can build up in groundwater and soils, resulting in long-term increases in salt concentration in streams, a phenomenon known as freshwater salinization. Freshwater salinization is occurring across North America, and increases in salt concentration threaten the fish, insects, mussels, and other organisms living in streams. By measuring salt concentration in November, before winter road salts are applied, we capture baseline concentrations that reflect long-term buildup of salts in soils and groundwater. 

The results of the sampling blitz indicate that salt pollution (as measured by chloride concentration) varied widely across the headwaters of Darby Creek. Chloride concentration ranged from 34 ppm to 230 ppm (Map 1). The lowest chloride concentration was measured at Site 19, a site located on Camp Run, a small tributary to Darby Creek. The area that drains into Camp Run is predominantly agricultural land, with some sections of limited residential development and forest. By contrast, chloride concentration was highest at Site 2, a site on an unnamed tributary. The land that drains into Site 2 is similar to the size of the Camp Run watershed, but is much more developed. The tributary originates near a SEPTA train station and flows under Route 30, picking up salt and contamination from residential and commercial developments. Identifying pollution hotspots, such as Site 2, can help determine areas that should be targeted for future restoration. 

Map 1. Sample sites in the headwaters of Darby Creek. Each point represents the approximate location of a sample site and is colored by the chloride concentration at that site. Low chloride concentrations are represented by pale yellow, with high chloride concentrations represented by a dark red. The red box indicates the sample area.

Another indicator of water quality that volunteers measured was specific conductivity, which reflects how well electricity can move through water. Pure water is a poor conductor and has a low conductivity. As more ions are added to the water — from pollutants such as salts, fertilizers, and heavy metals — conductivity increases. Conductivity also varied greatly between sites, ranging from 325 to 967 μS/cm. While a higher conductivity indicates a higher concentration of pollutants, it does not indicate the type of pollutant. When chloride (which is an ion that increases conductivity) is compared to conductivity at each site, we found that there is a strong relationship between the two measurements (shown by the trendline), indicating that salt pollution is the biggest driver of conductivity in the headwaters of Darby Creek (Figure 1). However, there are two sites, Site 1 and Site 9, that do not quite follow the relationship. Further research is needed to understand what is driving conductivity at these sites. To learn more about conductivity, check out the State of Our Streams Report. 

Figure 1. The relationship between chloride concentration and specific conductivity in the headwaters of Darby Creek. Each point represents a chloride concentration and specific conductivity measurement taken at a sample site. Points are colored by site. 

The results of the snapshot survey indicate that water quality is highly variable in the headwaters of Darby Creek. Sites that drain the highly-developed Route 30 corridor, such as Site 2 and Site 5, have relatively poor water quality, while sites that drain areas with more open space, such as Site 18 and Site 19, have much better water quality. The variability in water quality within a small section of the Darby Creek Watershed highlights the deep connection between local land use and stream health. Protecting areas of open space, especially in small tributaries, is crucial to maintaining and improving water quality throughout the entire watershed. 

Additionally, increasing awareness of threats to water quality, such as winter road salt application, can help to reduce the impact on local streams. To reduce road salt contamination in streams, avoid over applying salt and sweep up any salt that remains after snow and ice have melted. The salt can be reused for the next winter storm, saving money and helping improve water quality! 

This snapshot survey was a pilot for a larger survey WCT, DCVA, and Stroud Water Research Center are hoping to conduct in the spring. We are deeply grateful to the Upper Main Line YMCA for hosting this event and to our fantastic volunteers who were willing and eager to explore new sections of stream to collect this data. The snapshot survey would not have been possible without our partnerships with DCVA and Stroud Water Research Center. If you are interested in joining our community science program, please contact Lauren McGrath at lbm@wctrust.org. 

Filed Under: Conservation, Nature, Science, Volunteers, Watershed

My Conservation Journey: A Tale of Two Countries

December 1, 2022 By Bird Conservation Team

By WCT Bird Conservation Associate Phillys N. Gichuru
Cover Photo by Jennifer Mathes

My first memorable conservation experience was when, as an undergrad, my population genetics professor walked into the classroom and very nonchalantly said he was going to miss one of our classes, because he was going to participate in the translocation of elephants from the larger Narok area into Maasai Mara National Park in Kenya. Of course, all five of us in the classroom asked if we could go along too. That experience is how I was sold on conservation as a viable career option for me. It was the thrill, the tender care for each animal, and the passion for the job that drew me in. This was true for every job experience I took on after that. 

I went on to work with Ol Pejeta Conservancy as a field technician affiliated with my university at the time, collecting black rhino (Diceros bicornis) dung samples for non-invasive genetic analysis to study population genetics. Technically, the fresher the dung, the better the chances of getting DNA from it. What was most endearing about this experience is because black rhinos are critically endangered, at the time, every rhino in this population was monitored very closely to reduce poaching incidences. Over time, each warden knew every little detail about the rhinos, and they called you when the dung was fresh with a bonus story of how they had just gotten chased by a rhino and had the torn trousers to prove it. 

While conservation in Kenya and the US is very similar in a lot of aspects — including my observations they both rely heavily on donors/fundraising, habitat loss is a never-ending concern, and passion drives most people in this field — it is also very different. Most of Kenya’s wildlife can be found in protected areas, Kenya does not employ hunting as a model of conservation, and most obviously, we have a lot more charismatic megafauna that tend to get a lot of attention. In parallel, Kenya heavily relies on tourism to fund conservation. Protected areas in Kenya are either federally owned (National Parks) or privately owned (mostly conservancies). While there are private conservancies, the federal government has a huge stake in management of endangered/critically endangered species such as the elephants, black rhinos, Hirolas, Sable, and Roan antelopes, wild dogs, Grevy (zebras). 

Oh! If it wasn’t obvious, we took part in that elephant translocation. The adults get darted and tranquilized from a helicopter and you swoop in very fast with a 4-wheel car right before they go down. To tranquilize the calves, if present, we load them on a huge truck and move them to the park. It takes phenomenal precision.

Now at WCT, I am far from the savanna and I work to conserve animals that are significantly smaller than the elephants and rhinos. I’ve found that the precision required in the elephant translocation process lends itself to the precise skills used to gently remove birds from our mist nets before wrapping tiny bands around their slim legs in the bird banding process. Conservation comes in all shapes and sizes.

To learn more about the science of endangered feces, click here.

— By WCT Bird Conservation Associate Phillys N. Gichuru

Filed Under: Bird Banding, Bird Conservation, Conservation, Nature, Staff

Project Plastic and the Hunt for Microplastics

July 27, 2022 By Watershed Protection Team

By Amy Amatya of Project Plastic

Some of the greatest challenges humanity faces today — pandemics, climate change, water contamination — are invisible. They escalate because we don’t see them coming, or we ignore the data that help us see them. 

Microplastics are no exception. Defined as any plastic smaller than five millimeters in diameter, microplastics pose a big problem to the environment and ourselves. They are easily ingested, potentially toxic, and everywhere. In fact, microplastics are found in nearly every corner of the world, right down to the tissues of living organisms. 

Microplastics exist via two pathways: they are mass-produced to be this size (‘primary’), or they come from the degradation of larger plastics (‘secondary’). Primary microplastics are difficult to target because production is controlled by industries including textiles, cosmetics, and household items. Considerable persuasion of regulators and corporations is necessary to reduce microplastic production. Some progress has been made on this front, as the Microbead-Free Waters Act of 2015 prohibits microplastic use in wash-off cosmetics. However, secondary microplastics are difficult to target because a lot of plastic already exists in the world. The sheer difference in scale between microplastics and the landscapes they inhabit prohibit remediation. Even if we ceased all plastic production today, there are still 200 million tons of plastic circulating in our oceans.

Despite their huge threat, there are no consistent protocols available for the accurate and 

systematic recording of microplastic pollutant concentrations in water. There is also no existing technology available to sequester all microplastics from tributaries, effluent streams, reservoirs and lakes. There are three approaches to reducing microplastic pollution. We can: 

1) Produce less plastic, 

2) Prevent existing plastic from entering the environment, and 

3) Remove microplastics directly from the environment. 

The Project Plastic meets with the ACUA Wastewater Treatment Facility about the future of Plastic Hunters in wastewater management systems. Photo by Project Plastic

Project Plastic was moved by the third approach to develop the world’s first portable, affordable, and environmentally friendly microplastic measuring and sequestration device. Project Plastic is a team of chemists and architectural designers, but we aren’t just a filtration technology company. Driven foremost by the microplastic problem, we follow microplastics to the end of their aquatic lifetime. We strive to collaborate with riverkeepers, water treatment companies, and private bottled water companies to monitor, collect, and upcycle microplastic pollution from waterways. 

Our device utilizes a patented ‘artificial root’ technology that acts as a filter to remove small debris (including microplastics) from the upper water column, where most plastic pollutants accumulate. Our root technology is modeled after organic aquatic plant roots. Long fibrous filaments are suspended in water and sediments physically adhere to the dense fibers on each root. Naturally-occurring biofilms accumulate on the ‘artificial root’ network over time, which further traps small particles. By applying an array of ‘artificial roots’ to the underside of a flotational frame, our device can entrap large quantities of microplastics while allowing aquatic wildlife to swim below or between our filter. Each biofilter is attached to a removable pad, making it easy to swap biofilters once they become saturated. Each pad is housed within a hydrodynamic flotation frame for application in rivers, streams, and reservoirs.

The Plastic Hunter: a portable, affordable microplastic filter inspired by plant roots. Image created by Project Plastic

The Plastic Hunter has a key advantage over conventional filtration technologies: it has no mechanical components, meaning it can operate passively with no electricity and minimal maintenance. This makes the device far cheaper to produce, deploy and maintain compared to any existing microplastic filtration system.

Lastly, our team is currently working on establishing protocols for the separation and purification of contaminated sediments from our filter media. In doing so, our team hopes to extract relatively pure microplastic sediments from our devices to be forwarded to our research collaborators at the University of Washington in St Louis. The aim is to develop a method of converting microplastics into chemical compounds like carotene. If successful, our team may be able to upcycle microplastics into useful chemicals for other industries like pharmaceuticals, turning harmful waste into sustainable resources. This, we hope, will avoid environmentally harmful storage or processing of contaminated sediment through incineration, and instead propagate a circular economy for microplastic waste.

— By Amy Amatya of Project Plastic

Filed Under: Nature, Science, Watershed

  • 1
  • 2
  • 3
  • …
  • 11
  • Next Page »

CONTACT

925 Providence Road
Newtown Square, PA 19073
(610) 353-2562
land@wctrust.org

JOIN OUR MAILING LIST

Copyright © 2025 · WCTRUST.ORG